How to Create Animated Subtitles for TikTok & YouTube Shorts
In vertical feeds like TikTok, Instagram Reels, and YouTube Shorts, keeping viewers engaged is a constant battle. Study after study shows that videos utilizing active, word-by-word animated captions experience a dramatic increase in average watch time and completion rates compared to videos with static text or no subtitles.
Adding dynamic subtitles mimics the rhythm of natural speech, catching the eye and reinforcing auditory hooks. In this ultimate step-by-step tutorial, we will show you exactly how to use our free animated subtitle generator to create professional, high-impact captions directly inside your web browser.
Why Animated Subtitles Boost Retention
Before diving into the steps, it helps to understand why this style works:
- Sensory Reinforcement: Seeing a word appear at the exact millisecond it is spoken anchors the message in the viewer's mind.
- Visual Pacing: Fast-paced subtitle animations create a sense of momentum, making the video feel shorter and more energetic.
- Accessibility: Over 70% of short-form videos are consumed on silent or in noisy areas where clean typography is vital.
Step 1: Prep Your Audio & Subtitle Script (SRT/VTT)
The foundation of clean subtitle animations is an accurate subtitle script.
First, record your video and ensure the voice track is clear of heavy background noise. Next, transcribe your audio. You can use auto-transcription tools or write the timestamps manually.
Save your transcription in the standard **SRT** (SubRip Subtitle) or **VTT** (Web Video Text Tracks) format. Ensure that your text is broken down into small segments (preferably 1 to 3 words per timestamp). Long paragraphs do not work well with active word highlights.
Step 2: Upload Assets to SubAnimate
Once your video and SRT/VTT file are ready:
- Open your browser and navigate to the SubAnimate browser subtitle editor at `app.subanimate.com`.
- Drag and drop your raw MP4 video file directly into the editor viewport.
- Drag and drop your SRT or VTT subtitle file to load the speech timestamps.
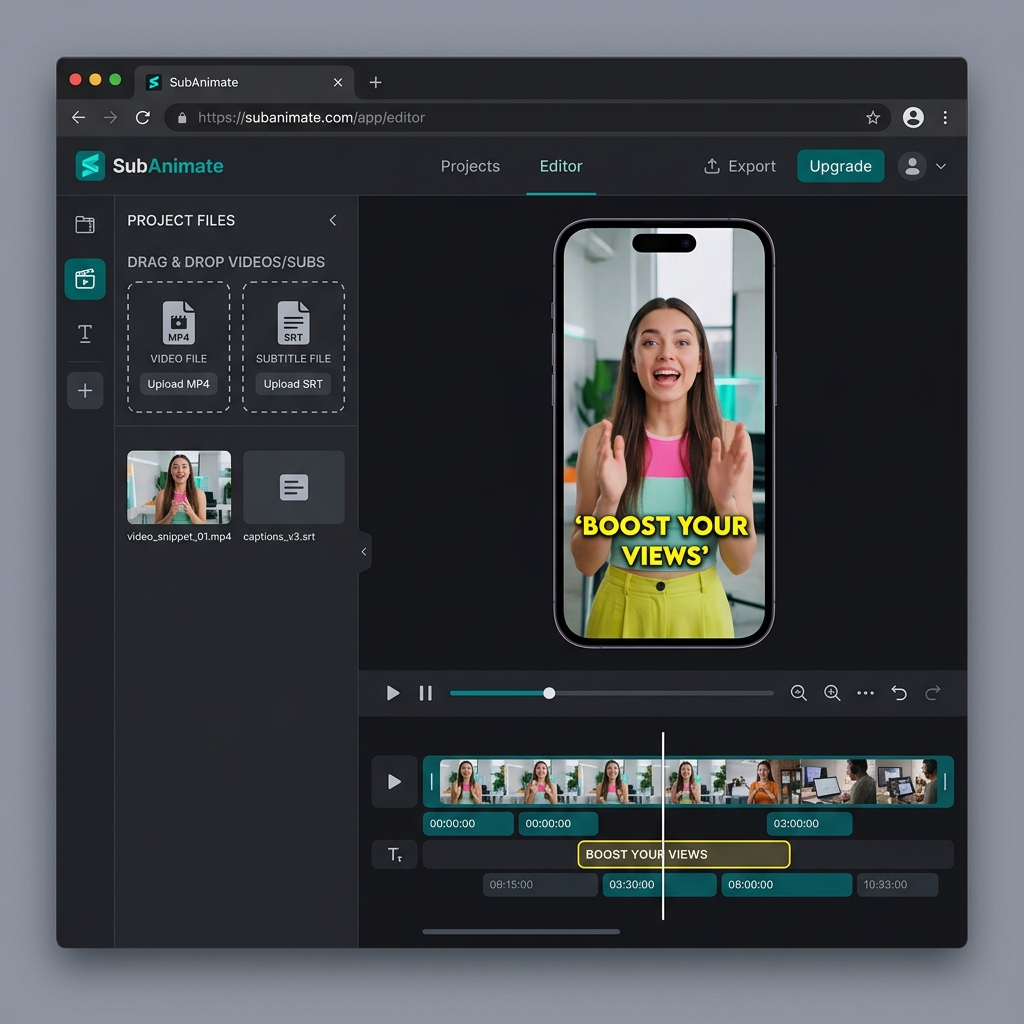
SubAnimate WebGL Editor Interface - Uploading Video and Subtitle Files
Since SubAnimate utilizes a 100% local client-side processing model, your video is read instantly by the browser. You do not have to wait for long upload processes, and your files never leave your device.
Step 3: Select and Customize Your Subtitle Style Template
This is where the magic happens. On the right-hand panel of the editor, you will find our curation of design templates:
- Alex Hormozi Preset: Features heavy, slanted yellow and green uppercase typography with a bouncy active word animation. Ideal for business and entrepreneurial niches.
- MrBeast Pop Preset: Uses clean Montserrat Black letters highlighted in bold cyan or yellow, pop-scaling each word as it is spoken.
- Minimalist Outline: A clean style with a subtle black border and no background shadow, perfect for lifestyle vlogs and aesthetic Reels.
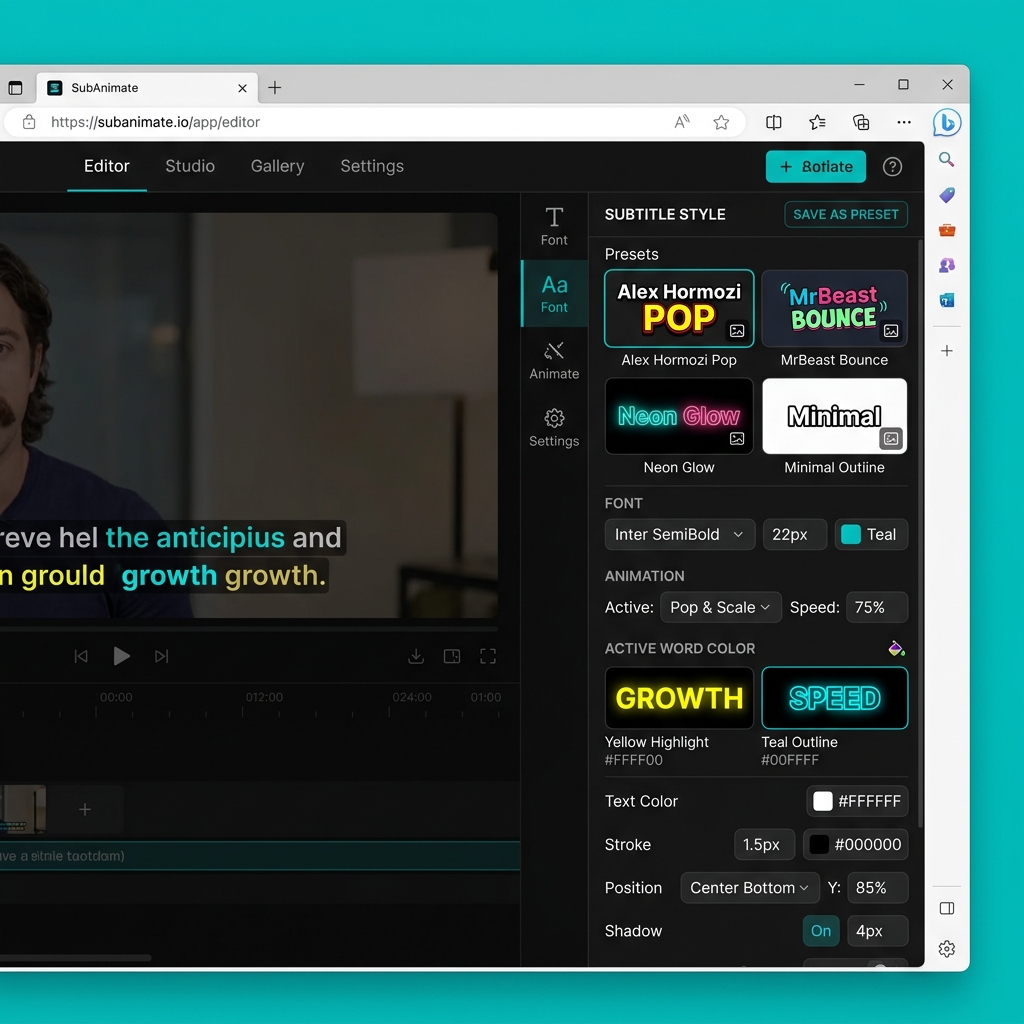
Customizing Subtitle Style Presets and Active Word Highlights in SubAnimate
You can customize every preset further: adjust the font size, modify the highlight colors, scale the animations, change outline thicknesses, or import your own custom font file to match your brand style.
Step 4: Locally Render and Export
Traditional video platforms process video renders on cloud servers, forcing you to wait in line.
SubAnimate uses your computer's local GPU via WebGL to render the animations directly inside your browser. Once you are satisfied with the subtitle preview, click the **Export Video** button.
The local generator will burn the animated captions directly into the video frames and download the finished MP4 file to your local device. Free of charge, with zero watermarks!
Step 5: Review and Publish
Before posting your video, preview it on your mobile device to ensure the subtitles fit the safe zones:
- Avoid Safe Zones: Do not place your subtitles too low (where TikTok descriptions and buttons sit) or too high (where they can be cut off). Keep them centered.
- Maintain Contrast: If your video has bright white frames, ensure your text outline is thick enough to preserve legibility.
By following this simple browser-based workflow, you can add highly engaging animated captions to your content in less than two minutes.
Written by Supul D
Video Tech SpecialistSupul D is a Video Technology Specialist and Lead Developer at SubAnimate. With extensive experience in browser-based WebGL rendering and video editing workflows, he specializes in building high-performance captioning tools for short-form content creators.